
|
Crafts
|
List All Forums | About |
I've been quiet this past week, so let me tell you about this thing I've been doing. It's fun, and it's been getting in the way of things I'm supposed to do; but it's reducing my yarn stash and creating warm gifts at the same time, and that's good!
Briefly: it's circular knitting on the fingers. If you want, you can think of it as spool knitting without a spool, because that's how it ends up: a thick, knitted tube. Before I start explaining, though, let me warn you that this is not only addictive, it's contagious: I caught it from Freda, who caught it from Ziggy, who caught it from someone else.... (Heh, heh. ![]() )
)
This technique makes a boa that will win the hearts of those who don't like boas. It's amazingly comfortable and very well-behaved. If you use several strands of yarn together, including textured yarns, you end up with a pleasingly dense, pretty result -- and if your yarn stash is like mine, with numerous odd balls of yarn in quantities too small for anything practical, this is very good news. The boa looks nicest when it contains a good selection of yarns. I've been using five or six strands in mine....
To start, take your yarns and make a loop with a slip-knot and place it on your thumb. You'll take this off soon, but it serves as an anchor while you start knitting.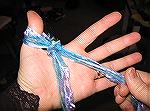
To "cast on", weave the yarn across the fingers of your hand (passing in front of the index finger), then turn the corner around your pinkie and weave the yarn back to the start.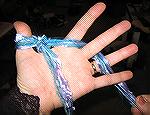
Then knit: bring the yarn across the fingers "above" the stitch already on the fingers, pick up the stitch already on the finger, then take it over the yarn and off the end of the finger -- if you ever did spool knitting, you'll see this is the same movement as knitting on the peg of a knitting spool. Go to the next finger and do the same thing. Knit all the way across your hand. 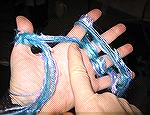

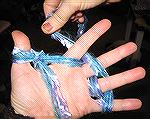
After knitting the stitch on your pinkie, you're ready to go back to the beginning and start again: just bring the yarn across the back of your hand to the index finger. (My fingers are long and flexible, and as you can see in the picture, they lean toward each other as I work. If your fingers are stiffer, don't worry -- you can bring the yarn straight across the back, and what looks like a long float will disappear when you pull on the snake later on. Trust me -- it works!)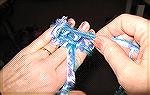
Keep knitting. After you've knit several rounds, take the loop off your thumb and pull on it, pulling away from the back of your wrist. The snake starts taking shape!
When the snake, er, boa is as long as you'd like, cast off: knit the stitch on the index finger, then move that new stitch onto the middle finger. On the middle finger, knit the old stitch over the new, then take that resulting stitch and move it onto your ring finger. Do the same thing again, then do it again on the pinkie -- and you'll be left with a single stitch. Cut the yarn and pull it through this stitch, because that's the end.
Finish with pom-poms, or with tassels, or with beads, or with whatever calls to you from the stash basket. I think this is becoming my favorite way of using odd-ball yarns.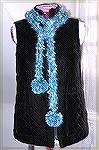
Fun, huh?? And for those who'll be travelling this winter, airlines are unlikely to confiscate the tools needed for this kind of knitting.... ![]()
Ruth
Uploaded: 11/30/2005